Add a Subscriber
Overview
This page creates a new subscriber — the customer's identity, login credentials, connection type and (optionally) their KYC documents. Once saved, the subscriber appears in the list and can be given a package and recharged.
Who Can Use This Feature
Staff who onboard new customers.
Required Permissions
- Subscriber → Add.
Prerequisites
- You know the connection type (Regular username/password, MAC-based, or Lease/static-IP).
- Your package groups and, for static setups, your IPv4/IPv6 pools exist.
- Any documents required by your KYC policy are to hand.
Navigation
Subscribers → Add Subscriber
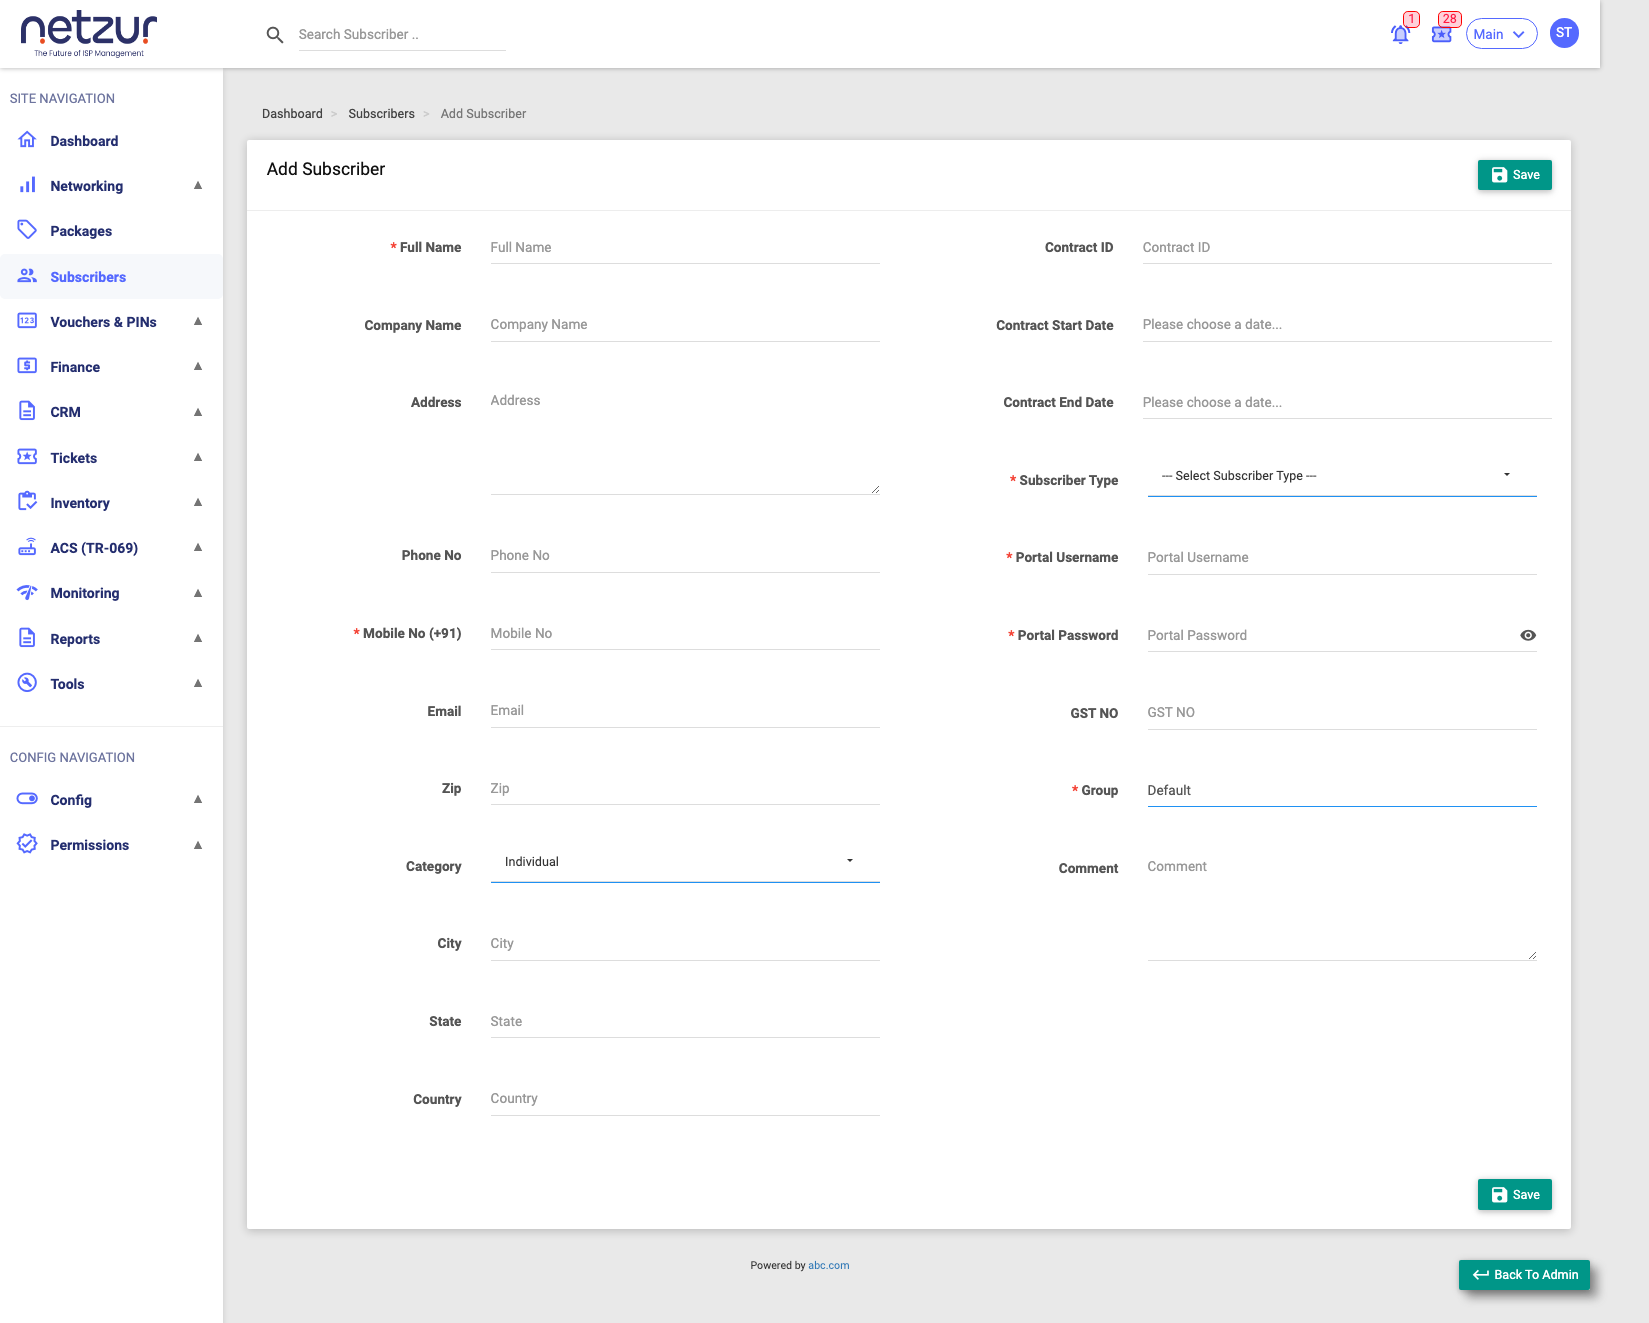
Choose the connection type first
The Sub Type field decides which connection fields you'll see — set it early:
| Sub Type | Use it for | Extra fields it shows |
|---|---|---|
| Regular | Standard username/password (PPPoE/Hotspot) customers | Username and Password (each with a Generate button) |
| MAC | Devices identified by their hardware MAC address | MAC Address |
| Lease | Customers on a fixed static IP | Static IPv4 Pool and Static IPv4 Address |
Sub Type, Portal Username, Portal Password and Group are always required. Most other fields are required only if your site's mandatory-fields policy marks them so (shown with a red *).
Step-by-Step Instructions
- Go to Subscribers → Add Subscriber.
- Set the Sub Type (Regular / MAC / Lease).
- Fill the personal details (left): Full Name, Company Name, Address, Phone/Mobile, Email, Zip, City, State, Country, Category.
- Fill the connection & login details (right):
- For Regular: enter a Username and Password, or select Generate for each. Tick Same as above to copy the username into the password.
- For MAC: enter the MAC Address.
- For Lease: pick the Static IPv4 Pool, then the Static IPv4 Address.
- Set the Portal Username and Portal Password (the customer's self-care login).
- Choose the Group (defaults to
Default).
- (Optional) Add Contract ID / Start / End, a Tax No, and a Comment.
- (If your policy requires) upload documents and complete e-KYC (see below).
- Select Save.
Field Reference
Personal details (left)
| Field | Name | Description | Options |
|---|---|---|---|
| Full Name | fullname | The customer's name. | — |
| Company Name | company_name | For business customers. | — |
| Address | address | Service/postal address. | — |
| Phone No | phone_no | Landline / alternate number. | — |
| Mobile No | mobile_no | Mobile (with country code). | — |
email | Email address. | — | |
| Zip | zip | Postcode. | — |
| Category | category | Customer category. | Individual, Company |
| City / State / Country | — | Location. | — |
Connection & credentials (right)
| Field | Name | Required | Description |
|---|---|---|---|
| Sub Type | sub_type | Yes | Regular / MAC / Lease — sets the fields below. |
| Static IPv4 Pool | static_ipv4_pool_id | Lease | The pool to draw the fixed IP from. |
| Static IPv4 Address | ipv4_address | Lease | The specific fixed IP. |
| MAC Address | mac_address | MAC | The device's hardware address. |
| Username | username | Regular | Connection login (Generate available). |
| Password | password | Regular | Connection password (Generate available). |
| Portal Username | portal_username | Yes | The self-care portal login. |
| Portal Password | portal_password | Yes | The self-care portal password. |
| Contract ID / Start / End | contract_id, contract_start_date, contract_end_date | No | Contract reference and dates. |
| Tax No | tax_no | No | The customer's tax/GST number (label matches your site setting). |
| Group | group | Yes | Subscriber group (defaults to Default). |
| Comment | comment | No | Internal note. |
Documents (KYC)
If your site is set to capture documents at creation, a Documents table appears with rows such as:
| Document | Choose a type from | Notes |
|---|---|---|
| ID Proof | Aadhar Card, Voter ID, PAN Card, Driving License, Passport, Other | Upload image/PDF (multiple allowed). |
| Address Proof | Aadhar Card, Driving License, Voter ID, Ration Card, Electricity Bill, Telephone Bill, Bank Passbook/Statement, Post-Office Passbook, Other | Upload image/PDF. |
| Passport Size Photo | — | Image. |
| Signature | — | Image (or signature pad). |
| CAF Form | — | The customer agreement form (optional). |
You can also add these later from the subscriber's Documents & KYC tab.
e-KYC (Aadhaar / DigiLocker)
If e-KYC is enabled, a Verify e-KYC button lets you verify identity electronically:
- Choose the document Type and enter the Document Number (and DOB for a driving licence).
- Enter the Captcha Code shown.
- Complete the OTP step (or send a DigiLocker link to the customer's email/mobile via SMS/WhatsApp).
On success the subscriber is marked verified. e-KYC actions reach an external verification service.
What Happens After Saving
The subscriber is created and appears in the list. Next steps are usually to assign/recharge a package and (for prepaid) take the first payment — see Recharge and Renew.
Important Notes
- Pick the Sub Type carefully — it changes how the customer authenticates and can't be casually swapped later.
- Generate creates strong credentials; note them before saving if the customer needs them.
- Required fields depend on your site's mandatory-field and document policy, so your form may show more or fewer * marks than another site's.
Common Mistakes
- Choosing Regular but intending a MAC/static setup (or vice versa).
- Leaving Portal Username/Password blank — they're always required.
- Uploading the wrong document under ID Proof vs Address Proof.
Troubleshooting
| Problem | Likely cause | What to do |
|---|---|---|
| Can't pick a Static IPv4 Address | No pool selected, or pool exhausted | Choose a pool first; ensure it has free addresses. |
| Username "already exists" | Duplicate login | Use Generate or pick another username. |
| e-KYC fails | Wrong number/captcha, or provider issue | Re-check the document number and captcha; retry. |