The Subscriber Profile
Overview
Selecting a subscriber's Username in the list opens their profile — the single screen where you see everything about that customer and run every action on them. This page explains the profile's layout so the rest of the module makes sense; the detail lives on the linked tab and action pages.
The profile has three parts:
- The header — a summary card, key figures, quick information, and the action buttons.
- The tabs — Personal Info, Technical Info, Documents, Finance, Statistics, Settings, Tickets, CPE, and Audit Timeline.
- The actions — buttons and menus (Recharge, Other Actions, and the top-right status buttons) that change the subscriber.
New to how billing works here? Read Billing & the Subscriber Lifecycle first — prepaid vs postpaid, auto-renew, grace/suspension, disconnection and deactivation. It's the backbone the actions below act on.
Navigation
Subscribers → (select a subscriber's Username)
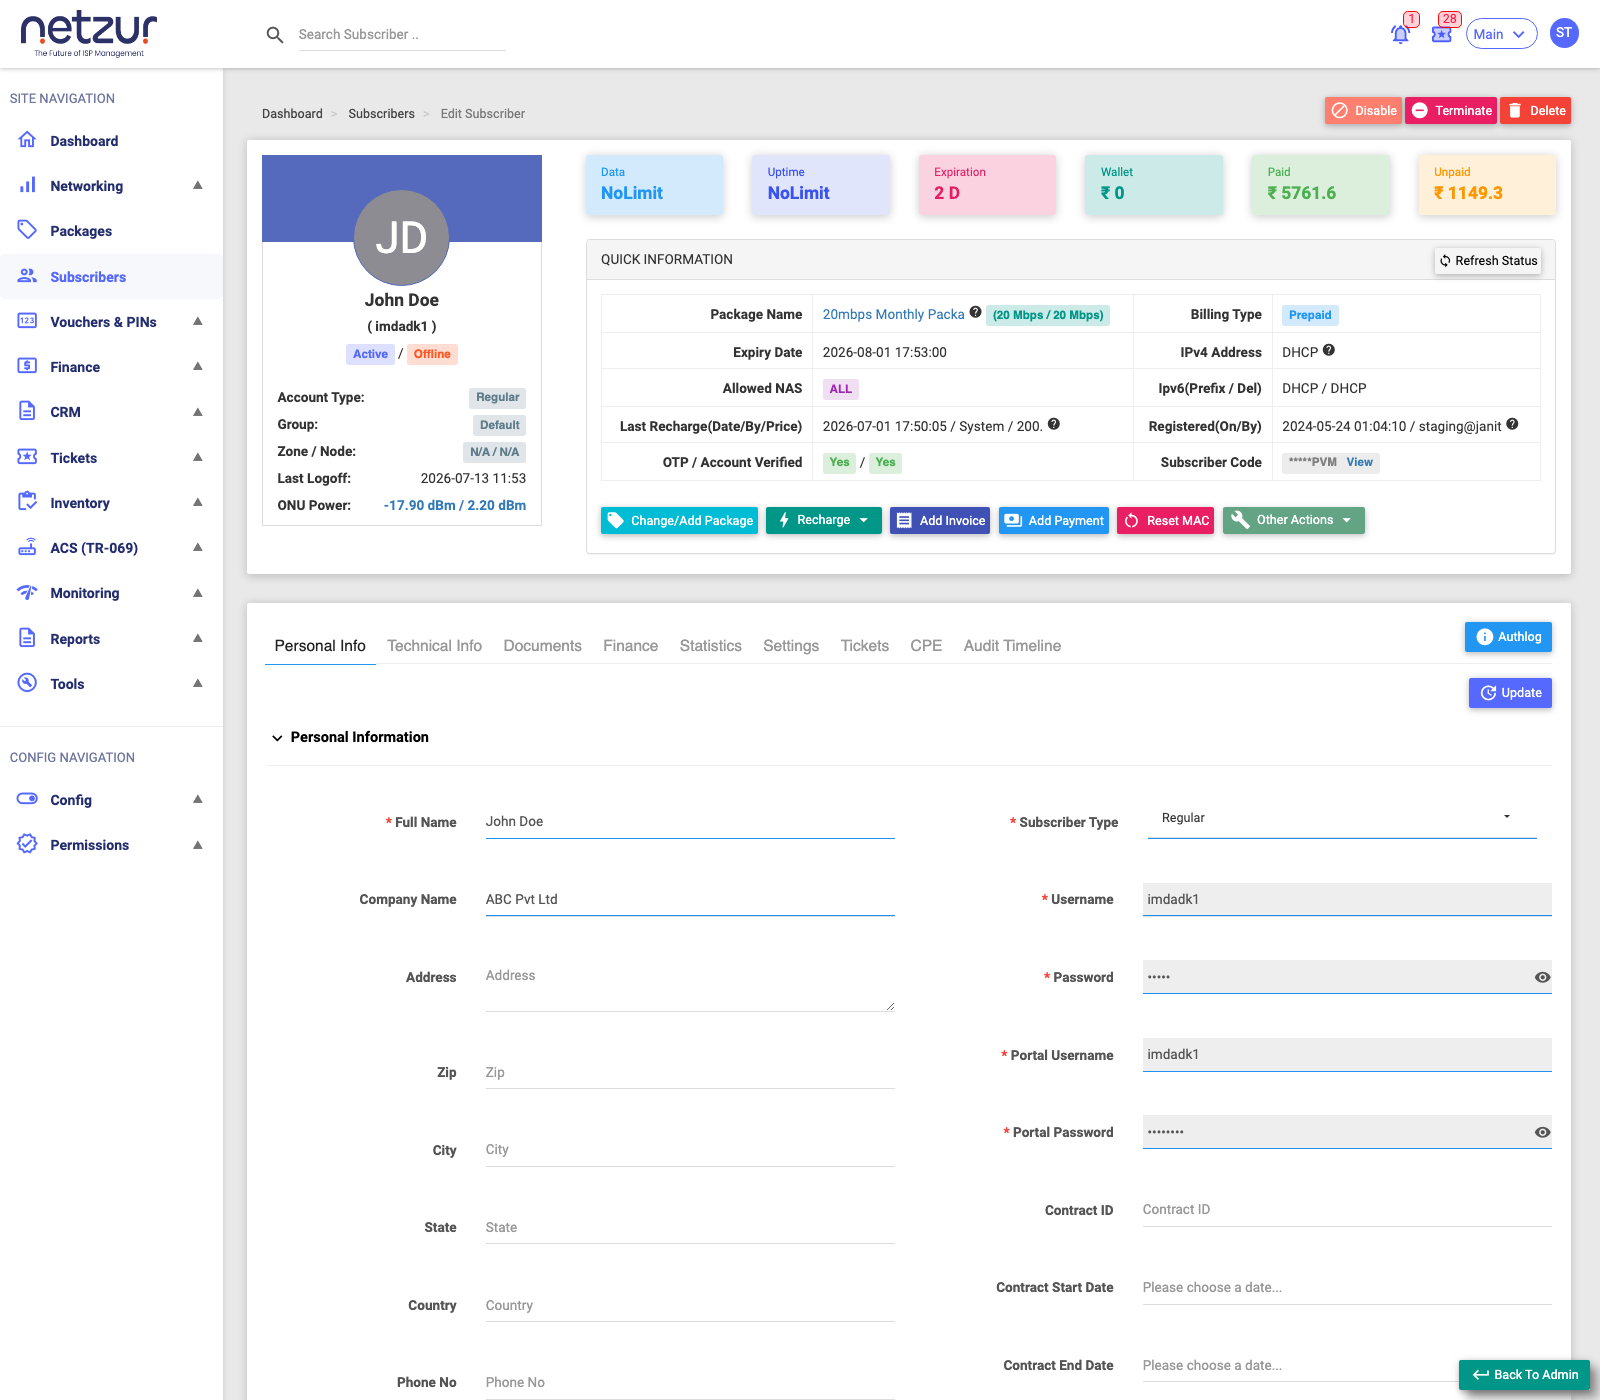
The header
Summary card (left)
Shows the photo/initials, Full Name and ( username ), and two badges: the account status (Active, Disabled, Suspended, Expired, No Package…) and the connection status (Online (n), Offline, or Blocked). Below are Account Type, Group, Zone / Node, Last Logoff, and — for fibre customers — ONU Power (Rx/Tx).
Key figures (KPI boxes)
Six boxes summarise the account at a glance:
| Box | Meaning |
|---|---|
| Data | Remaining data (or NoLimit). |
| Uptime | Remaining time (or NoLimit). |
| Expiration | Time left before the plan expires. |
| Wallet | The subscriber's wallet balance. |
| Paid | Total amount paid. |
| Unpaid | Amount still receivable. |
Quick Information
A table of the essentials: Package Name (with speed and any active booster/FUP), Billing Type, Expiry Date, IPv4 Address (Static/DHCP), Allowed NAS, IPv6 (Prefix/Del), Last Recharge (date/by/price), Registered (on/by), OTP / Account Verified, and the Subscriber Code (hidden until you select View). Refresh Status re-checks the live state.
The action buttons
Along the header you'll find:
- Top-right: Disable, Terminate, Delete.
- Standalone: Change/Add Package, Add Invoice, Add Payment, Reset MAC.
- Recharge menu: Recharge, Advance Recharge (or Activate for postpaid), Recharge IPTV, Recharge OTT, Add Top-up, Add Speed Booster, Add Addon, Upcoming Recharge.
- Other Actions menu: Login as Subscriber, Copy Auto Login/Renew URL, Change Expiry/Due Date, Set Data/Uptime Limit, Reset Data Usage, Add General Note, Change Username, Change Password, Override Bandwidth, Reset NAS Port ID, Change Zone/Node, Change Group, Verification, Add CPE Information, Send Message, Suspend Subscriber, Overwrite Package Price, Closed Connection, and more.
These are grouped into task-based guides:
| To… | See |
|---|---|
| Renew, advance-recharge or activate a plan | Recharge and Renew |
| Sell a top-up, booster or add-on | Top-ups, Boosters & Add-ons |
| Add TV/streaming | IPTV & OTT |
| Raise an invoice or take a payment | Invoices & Payments |
| Change the plan or its price | Change Package & Price |
| Move to a different group / zone / node | Change Group & Zone/Node |
| Disable, suspend, terminate or delete | Status Changes |
| Change usernames or passwords | Usernames & Passwords |
| Reset the MAC or NAS port binding | Reset MAC & NAS Port |
| Give custom speeds temporarily | Override Bandwidth |
| Set data/time allowances or reset usage | Data & Time Limits |
| Change expiry, due or billing dates | Billing Dates |
| Message the customer | Send Message |
| Record an internal note | General Notes |
| Log in as the customer | Login as Subscriber |
| Verify KYC / generate the CAF | Documents & KYC tab |
The tabs
| Tab | What it holds |
|---|---|
| Personal Info | Identity, contact, address, login identifiers, contract, custom fields. |
| Technical Info | MAC/NAS binding, login limit, NAS/OLT assignment, static IPv4/IPv6. |
| Finance | Invoices, ledger, recharge history, wallet. |
| Statistics | Live sessions, cumulative usage, usage graph, session history. |
| Settings | Alerts, billing/auto-renew, portal (UCP), IPTV defaults, RADIUS attributes. |
| Documents & KYC | e-KYC and uploaded ID/address/photo/signature/CAF documents. |
| Tickets | This subscriber's support tickets and their history. |
| CPE | The customer's equipment — ACS/TR-069 device, ONU, inventory. |
| Audit Timeline | The full change history for this subscriber — see Common Features. |
Auth Log
A blue Auth Log button sits at the right of the tab strip on every tab. It's the first tool to reach for when a customer says "I can't get online" — it shows the subscriber's most recent RADIUS authentication attempts (the last 10), so you can see whether each login was accepted or rejected and, crucially, why.
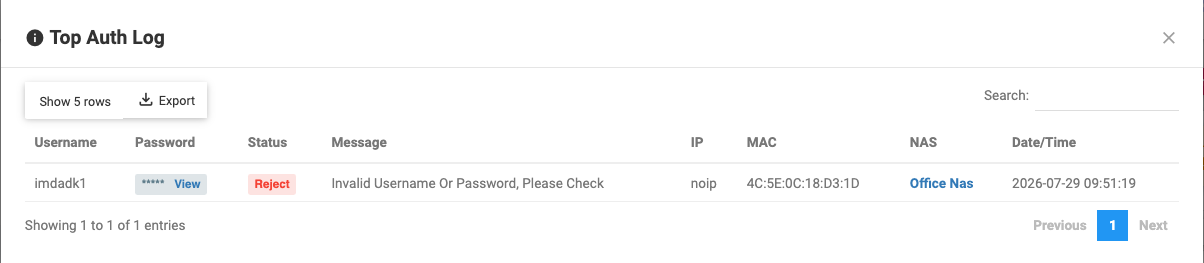
The Top Auth Log dialog lists each attempt (newest first):
| Column | Meaning |
|---|---|
| Username | The login used in the attempt. |
| Password | Shown only for rejected attempts — masked (last 3 characters), with a View link to reveal the exact password that was tried. Lets you confirm a "wrong password" report. Accepted attempts show nothing here. |
| Status | Accept (green), Reject (red), or another state (orange). |
| Message | The reason the RADIUS server gave — e.g. why the login was rejected. |
| IP | The IP address seen for the attempt. |
| MAC | The device MAC that tried to connect. |
| NAS | The NAS the attempt came through (links to that NAS). |
| Date/Time | When the attempt happened. |
How to use it: open Auth Log and read the latest rows. A Reject with a "wrong password" style message points to a credential problem (use the View to check the attempted password against the real one); repeated rejects with no user found suggest the wrong username or a disabled account; Accept rows confirm the customer is authenticating and the problem is elsewhere (session, IP, or the device). The MAC/NAS/IP columns tell you where they connected from.
The table is empty when there are no recent attempts for that subscriber (for example, a customer who hasn't tried to connect lately).
Important Notes
- Which tabs, figures and actions you see depends on your role permissions.
- Change/Add Package may require the subscriber to be KYC/OTP/account verified first.
- Most actions ask for an optional Remark — use it to record why you made a change; it shows up in the Audit Timeline.
Related Guides
- Subscribers Overview
- The profile tabs and actions linked in the tables above.