Announcement
Overview
An Announcement is a message you broadcast to many subscribers at once — a maintenance notice, a price change, a festival greeting — delivered over the channels you choose (Email, SMS, WhatsApp, Telegram, Push, or the customer portal) at a time you schedule. You pick the audience with filters, write the message once, and the system queues and sends a copy to every matching subscriber.
Navigation: Tools → Announcement
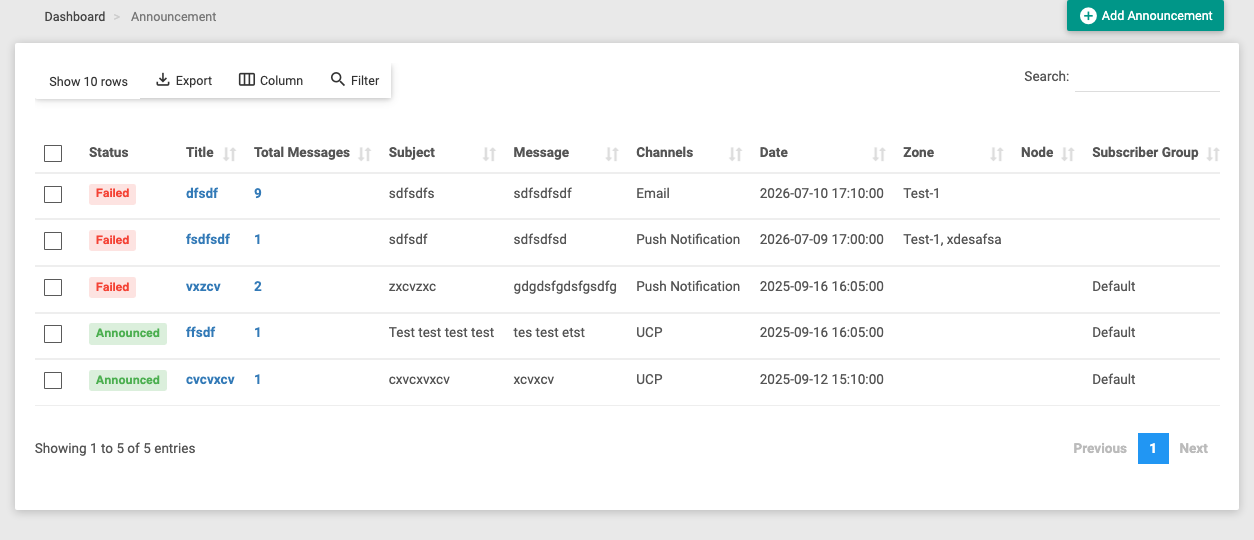
The announcement list
Each row is one announcement you've created:
| Column | Meaning |
|---|---|
| Status | Announced (all sent), Pending (scheduled, not sent yet), or Failed (one or more deliveries failed). |
| Title | Your internal name for it. While it's still Pending, the title links to the edit page. |
| Total Messages | How many individual messages this announcement produced (recipients × channels). Click it to see the per-recipient delivery list. |
| Subject / Message | The content sent. |
| Channels | Which channels it went out on. |
| Date | The scheduled send time. |
| Zone / Node / Subscriber Group | The audience filters used. |
The toolbar has the usual Show rows, Column chooser, Export and a row Search, plus a Filter button. Add Announcement (top-right) opens the compose form.
Creating an announcement
Click Add Announcement to open the compose form.
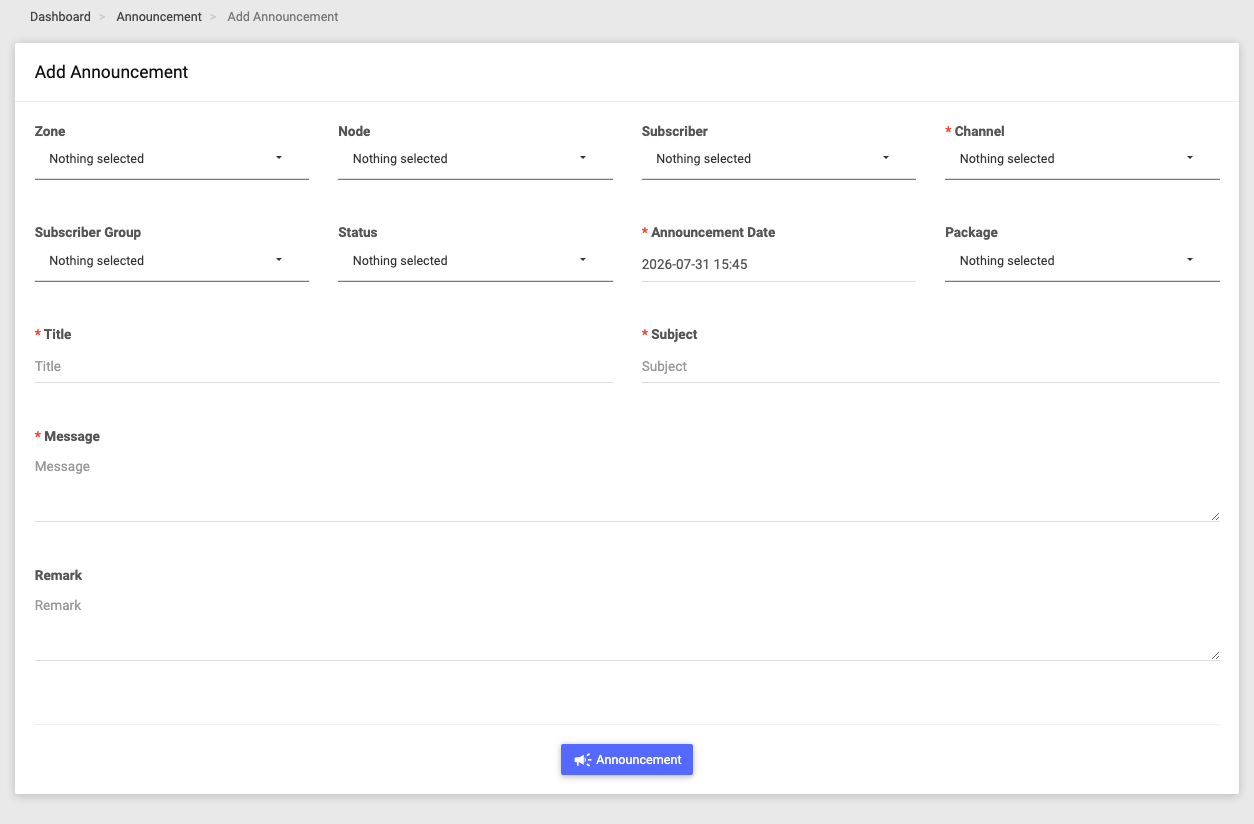
1. Choose the audience
Use any combination of these to decide who receives it. Leave them all empty to target every subscriber on your site.
| Filter | Effect |
|---|---|
| Zone / Node | Limit to subscribers in the chosen zones/nodes. |
| Subscriber | Pick specific customers by portal username. |
| Subscriber Group | Limit to one or more customer groups. |
| Package | Limit to subscribers on the chosen plans. |
| Status | Limit by account state: New, Active, Online, Enabled, Disabled, No Package, Expired. |
You can select multiple values in each box. The more filters you set, the narrower the audience.
2. Choose the channel(s)
Channel is required — pick one or more:
- Email, SMS, WhatsApp, Telegram, Push Notification — each appears only if that channel is enabled for your site.
- UCP — an announcement shown inside the customer's User Control Panel (the self-care portal). When you pick UCP, an extra UCP Announcement Interval field appears — how long the notice keeps showing (from 1 Hour up to 30 Days).
A separate message is generated for each channel you tick, for each recipient — so choosing Email + SMS for 100 customers creates 200 messages. That's what the Total Messages count reflects.
3. Schedule it
Announcement Date (required) is when it will be sent. It must be at least a couple of minutes in the future — the announcement is queued and sent at that time, not instantly.
4. Write the message
| Field | Required | Notes |
|---|---|---|
| Title | Yes | Your internal label for the announcement (customers don't see it). |
| Subject | Yes | The message subject/heading. |
| Message | Yes | The body text sent to customers. |
| Remark | No | An internal note, recorded in the audit log. |
5. Review and confirm
Clicking the Announcement button doesn't send straight away — it first shows a preview page listing every subscriber matched by your filters, so you can check the audience is right. Confirm there to save and schedule the announcement; it then appears in the list as Pending until its send time.
:::caution This sends real messages to customers An announcement delivers actual Email/SMS/WhatsApp/Telegram/Push messages to your subscribers at the scheduled time. Double-check the audience on the preview page and the send time before confirming. :::
Editing and deleting
- Edit — only a Pending announcement (not yet sent, and still more than ~2 minutes before its send time) can be edited, from its title link. You can change the title, subject, message and schedule; a remark is required and the change is logged. Once an announcement has started sending, it can no longer be edited.
- Delete — select announcements and delete them (a remark is required). An announcement that has already been sent cannot be deleted — only ones that never went out.
Tracking delivery
Click the Total Messages number on any announcement to open its delivery list — one row per recipient per channel, showing:
- Status — Announced (delivered), Pending (queued), or Failed.
- Channel — which channel that message used.
- The subscriber's username, name, email, mobile, zone, node and address.
- Error — the reason, on any failed delivery.
This is how you confirm whether a specific customer actually received the message, and why a delivery failed.
Related Guides
- Tools overview
- Notifications report — the system-wide log of every message sent
- Network Map